New Status Filter:
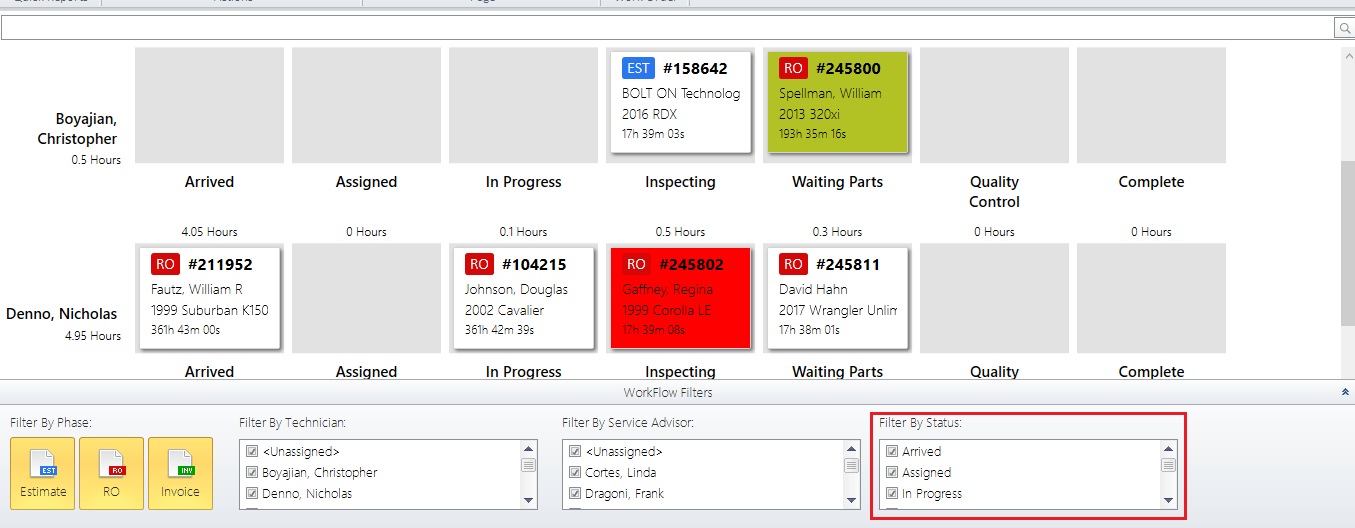
The new status filter gives the ability to filter the Workflow Manager view by statuses. This will allow the user to view repair orders by just their status. A user can customize the statuses in the Reports Pro Settings, under Workflow Manager. This new filter can allow a service writer to easily see the number of vehicles at each stage of the repair process. For example, a service writer can use this filter to see the number of vehicles completed so far today.
Enhanced Work Order Details:
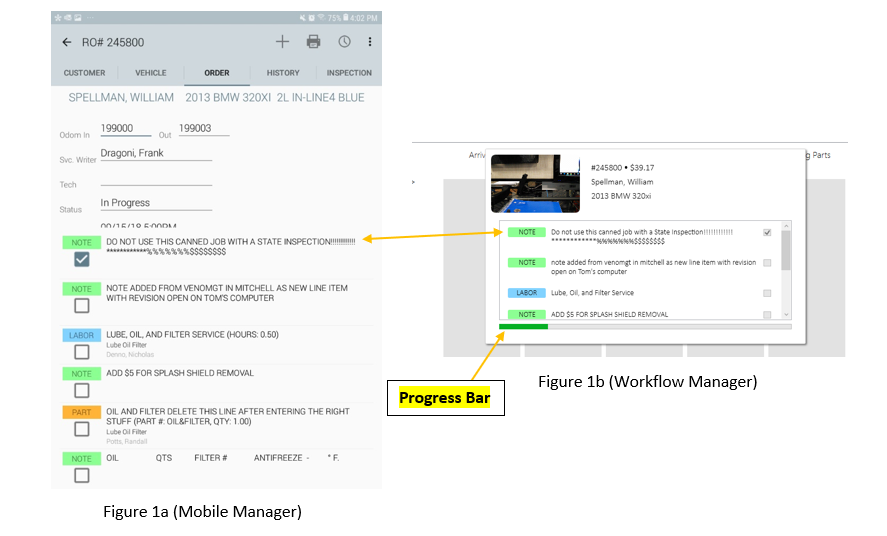
The new enhanced work order details are intended to tie Workflow Manager together with Mobile Manager. Now in Workflow Manager when a technician double clicks a work order tile a window will pop up that will resemble the technician worksheet in Mobile Manager (See figure 1a and 1b for illustrations below). As a technician is going through the work order and checking off each item on the Mobile Manager, the Workflow Manager is simultaneously updated. Also, recently implemented is the progress bar within the technician worksheet on the Workflow Manager (As seen below in figure 1b). As the items are checked off by the technician in the Mobile Manager the progress bar will show the updated progress in Workflow Manager.
Technician Assignment Improvements:
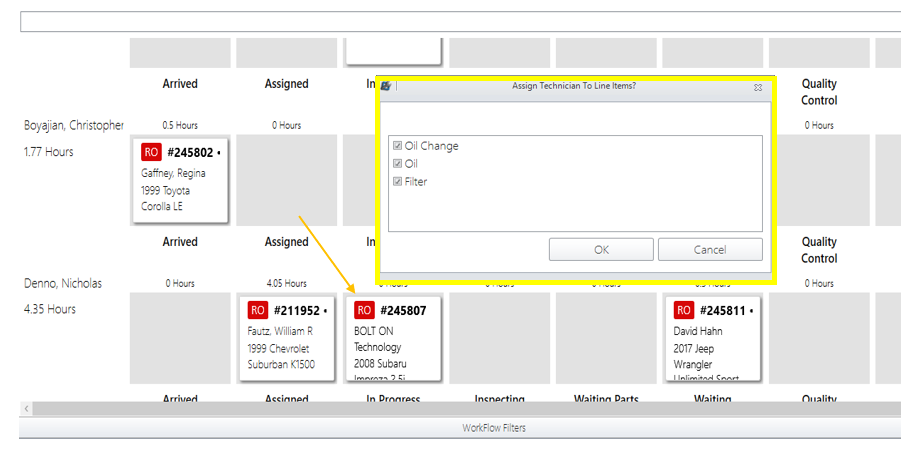
In the Workflow Manager, when the service writer moves the customer’s tile to a new technician, the service writer will be prompted to assign line items to that specific technician. For example, in the figure below, the “BOLT ON TECHNOLOGY” (RO #2455807) tile is dragged from our technician Christopher Boyajian, to a different technician Nicholas Denno. Once this action is performed the “Assign Technician to Line Items?” will prompt the service writer to select the line items they would like Nicholas to perform and get credit for.
Choose to Re-assign Technician for Only a Single Line Item (Right Click Line item):
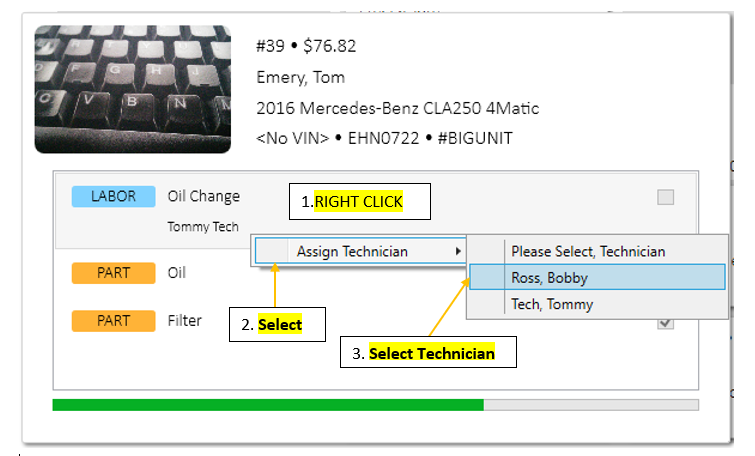
To perform this action please double click the customer’s tile you would like to re-assign certain line items to another technician. This will open the technician worksheet. Once the technician worksheet is open right click the specific line item you would like to re-assign to another technician. As seen in the figure below, the only option to select is “Assign Technician”. Once selected, your shop’s list of technicians will be available to select from. Then, select the technician you would like to assign to that specific line item.
This is useful for example, in cases where you have a dedicated alignment tech or diagnostic tech and do not want to go back to management system to assign.
A work order will appear on both technicians work in progress in Mobile Manager even if filtered by tech.
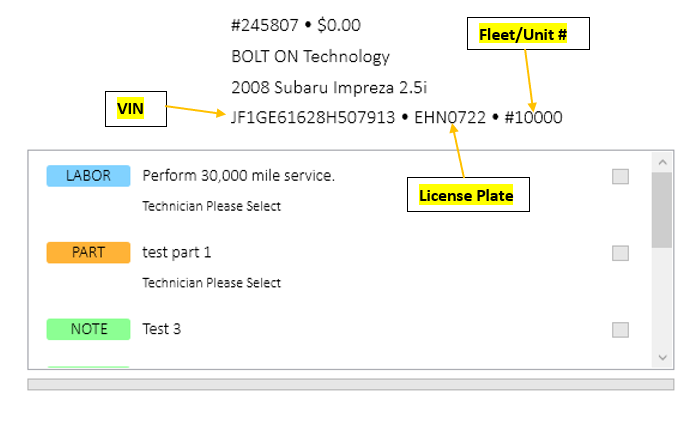
More Information on Work Order Detail Screen:
Now there is more customer information on the work order detail screen. This window is accessible by double clicking the customer’s tile in Workflow Manager.
New information:
License Plate
Fleet/Unit #
VIN
Total Hours Now Shown for Technicians in Each Status:
Now technicians and service writers can see how long each repair order should take a technician to complete. This will give the service writer the ability to see if a technician can handle more work for the day, or if another technician should be selected.
Shops will have the ability to schedule more work for technicians to reduce “downtime”, thus being able to service more cars per day.
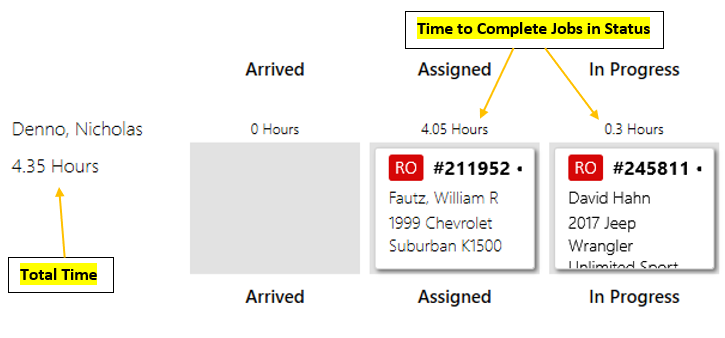
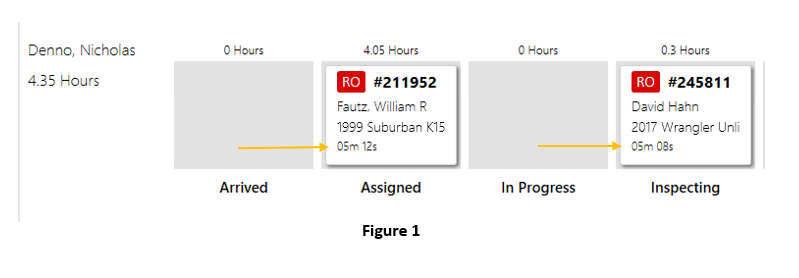
Status Time Function:
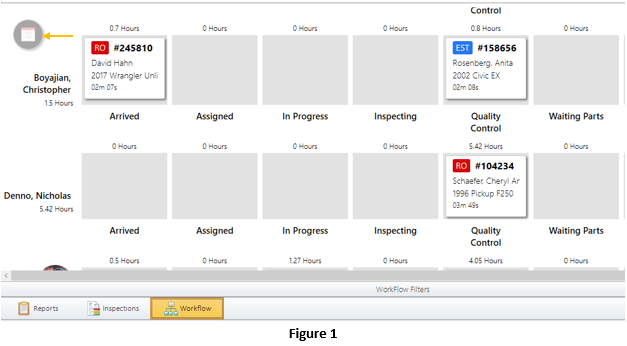
The status time function now shows the amount of time a repair order has been in a specific status. As seen in the figures below. Figure 1 shows the repair orders for technician Nicholas Denno that are in the “assigned” and “Inspecting” statuses. Now you will notice that there is a timer on the work order tile. In figure 2, the service writer dragged both work order tiles to the next status, and the timer reset.
We believe this will allow service writers to identify bottle necks in their workflow in real time, and not at the end of the day when it’s too late. Service writers can also use this feature to identify weak links in their shop’s workflow.

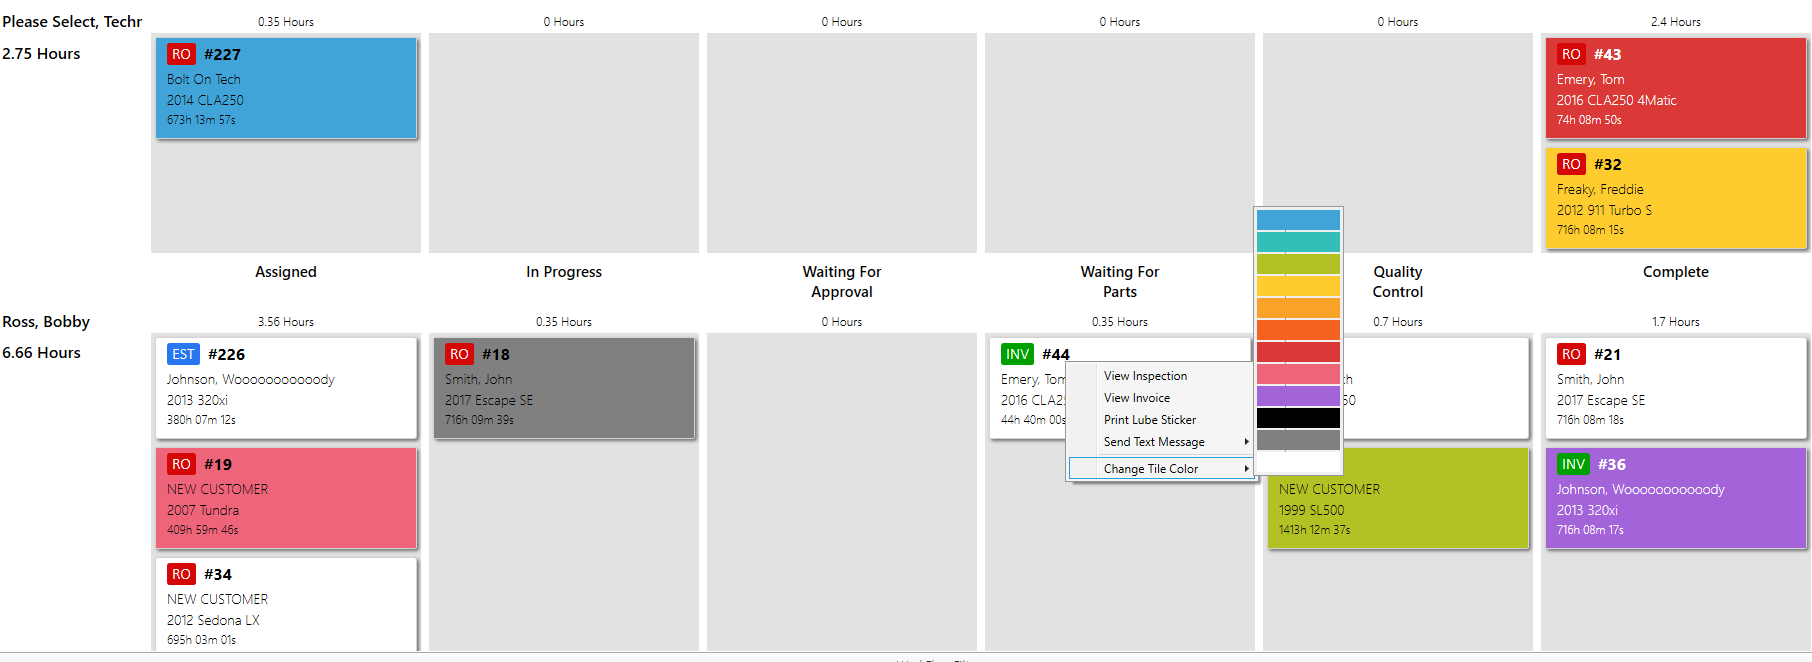
Workflow Manager Color Selector:
The Workflow Manager Color Selector allows a shop to color code workflow tiles. The color pallet includes twelve unique colors. A shop can use the Color Selector to create their own methods of differentiating workflow tiles at a glance. For example, one method may be to identify all Lube Oil and Filter (LOF), as the color Red. Once your shop gets accustom to your coloring method, identifying workflow tiles will become second nature.
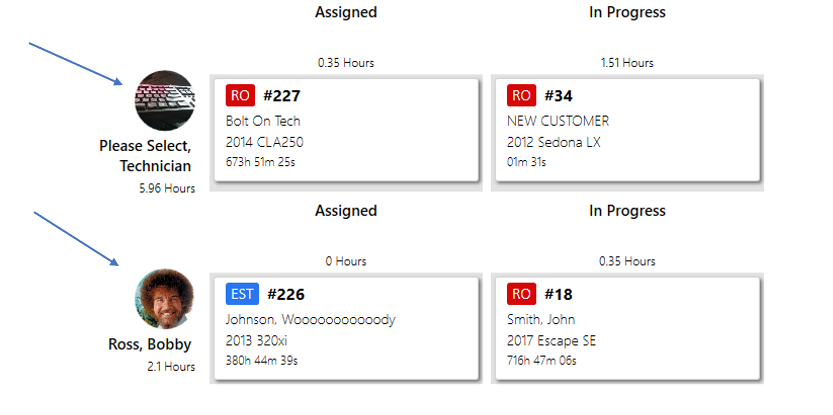
Employee Profile Picture now shown in technician workflow row:
Technician Profile Picture is now shown along with the Technician’s name located on the left-hand side of the Workflow Manager screen. This will add to the easily identifiable objects on the Workflow Manager screen.
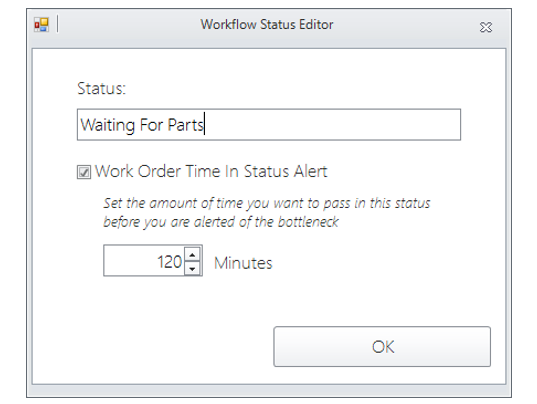
Workflow Status Editor:
Now available in the Workflow Manager settings. A service writer can set the specific time for how long they believe each status should take. Once the time for the specific status has gone over the set time an alert will occur by the tile flashing red to indicate a bottleneck. This will allow service writers to identify and correct issues in real time.

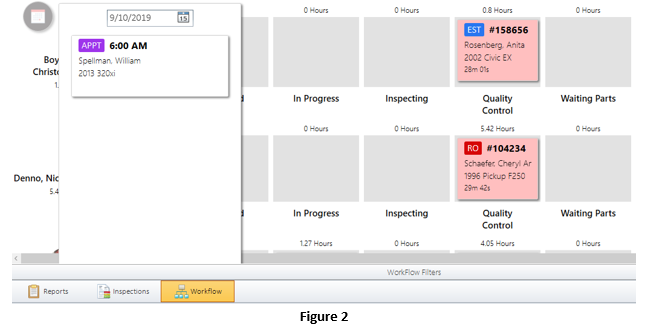
Appointment Integration:
The appointment integration feature is now available within Workflow Manager. This feature allows a service writer to open their appointment calendar and drag appointments from the appointment calendar right into the Workflow Manager. Once an appointment is dragged from the appointment calendar into the Workflow Manager, the service writer will be prompted if they would like to convert the appointment into an estimate. This all can be performed within the Workflow Manager without leaving the screen. Below, Figure 1 indicates where the appointment calendar is located in the Workflow Manager screen. When the appointment calendar is opened the service writer will see the all of the appointments available for that day (Portrayed in Figure 2). The service writer also has the ability to look at any days in their calendar to see how many appointments they have scheduled for the coming days. This will give the service writer the ability to set up the next day' workflow at the end of each day.
Bringing It All Together:
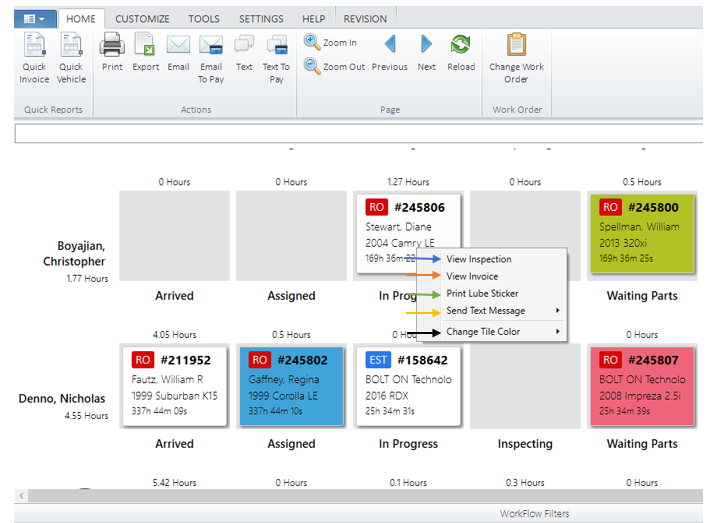
Workflow Manager links the rest of Bolt On Technology’s Pro Pack together. Users can now perform important tasks right from Workflow Manager without leaving the workflow screen, thus creating even more efficiency. When a repair order tile is right clicked, an option list will appear (Portrayed in the image below). The first option is “View Inspection”, which allows a user to view the inspections points that are being performed on that specific repair order. The next option “View Invoice” allows a user to view the invoice of the specific repair order, without having to search for it within the management system. The next option is “Print Lube Sticker”, this option allows a user to print a lube sticker for that specific repair order without leaving the Workflow Manager and opening Lube Sticker Pro. The option to “Send Text Message”, allows a user to send the specific customer a text message, without leaving the Workflow Manager and going into Message Manager. The “Send Text Message” option has pre-built message options, as well as the ability to create a custom text message. The “Change Tile Color” allows a user to change the color of the repair order tile in Workflow Manager to allow for different identifying methods.
Technician View:
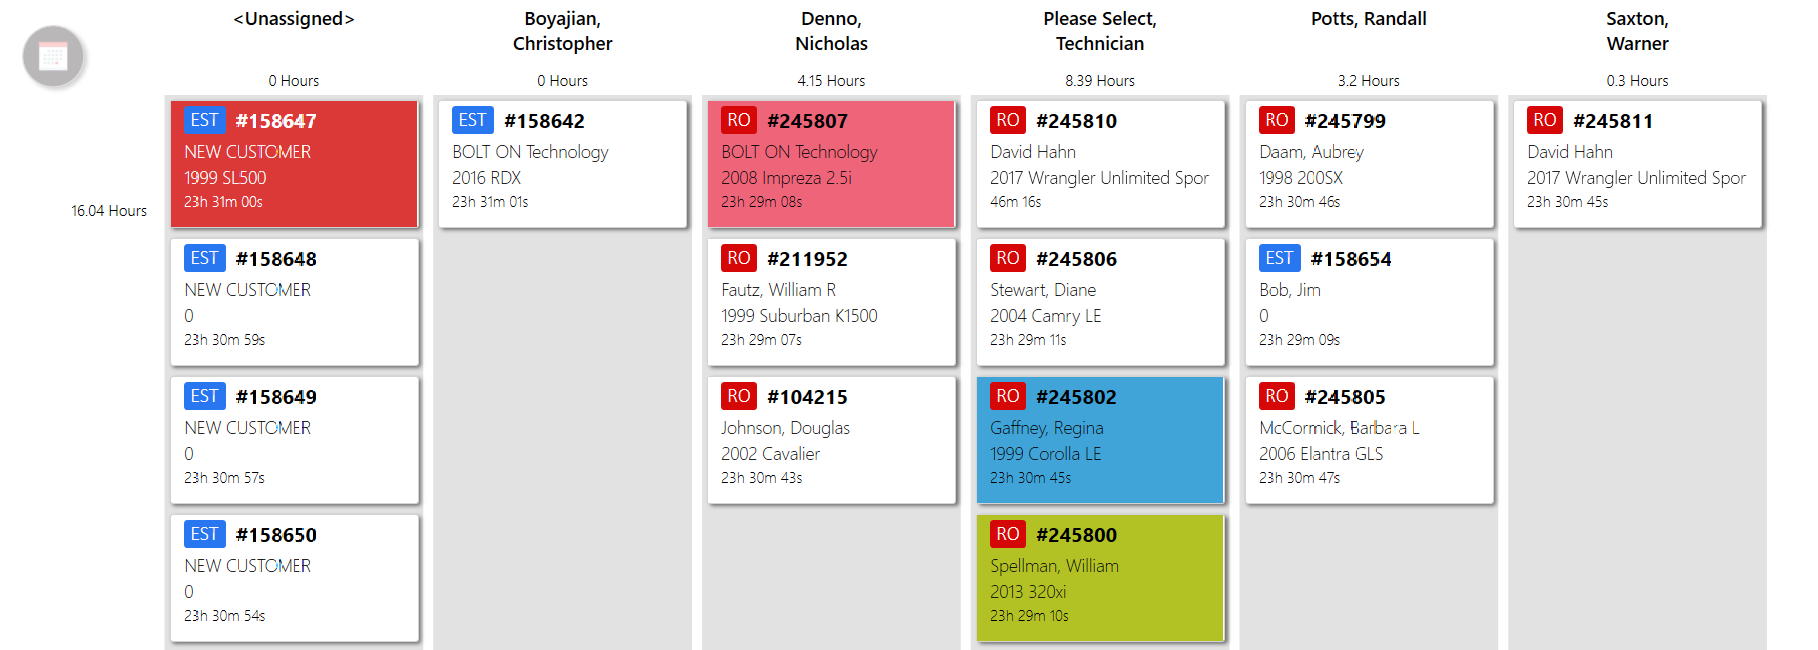
Due to popular demand, we have integrated the ability to revert to the original view of Workflow Manager. This is for shops that are accustom to the original Workflow Manager. Shops can now go back to the original Workflow Manager, until they are ready to make the company wide switch over to the new Workflow Manager. The original view of Workflow Manager is a one-dimensional view with only technicians being shown, instead of statuses and technicians
(Seen in the Figure Below). The Technician workflow view will not allow any statuses to be used. This view will not allow a shop to automatically update Status Tracker in Report Pro. You will still be able to drag tiles to other technicians in this view and perform all of the same tasks from the tile as the Statuses and Technician View.
Changing Workflow Views:
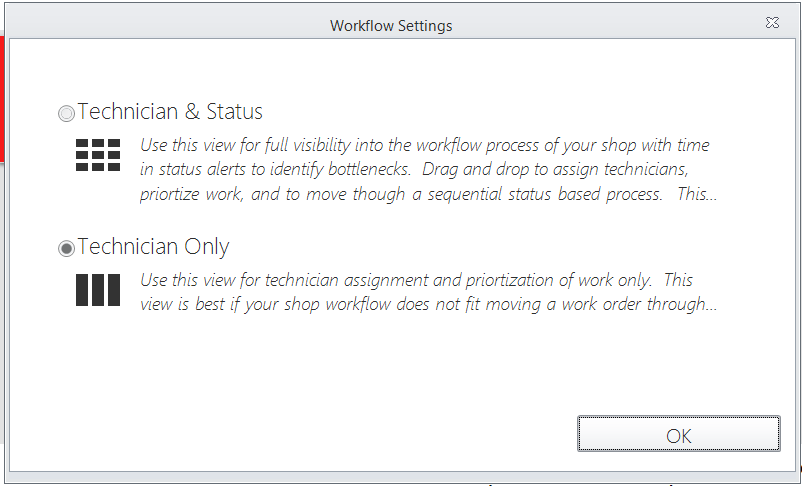
To change the Workflow Manager from the Technician and Statuses view to the Technician View, access the Workflow Settings on the top menu (See the first image below).

Selecting Workflow View:
Once you select Workflow Settings, you will be given the option of selecting "Technician and Statuses", or "Technician". The "Technician and Statuses" will be the default view (See figure below).
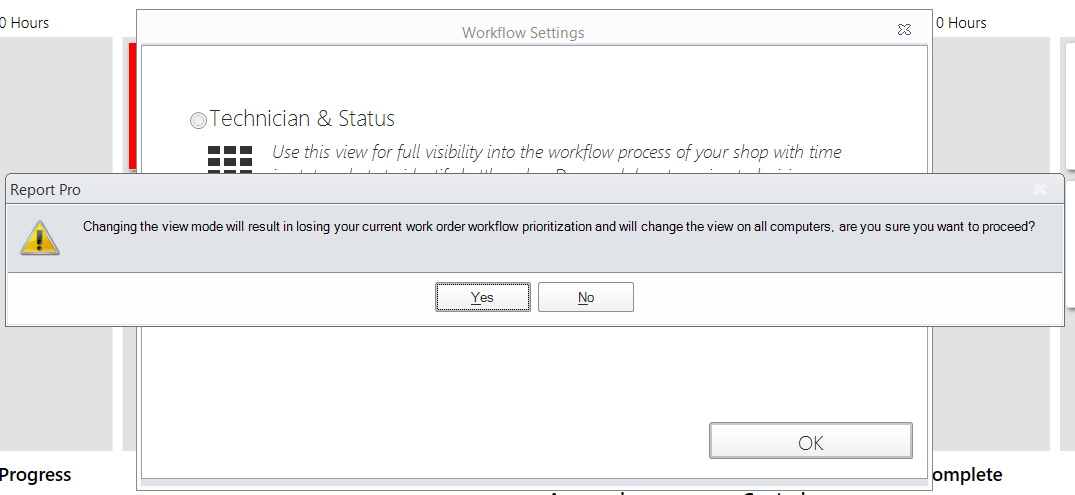
When you select a different Workflow view you will be prompted with a warning message, "Changing the view mode will result in losing your current workflow prioritization and will change the view on all computers. Are you sure you want to proceed?" If you use a different workflow view the prioritization of the statuses will not be held.


© 2026 Bolt On Auto Repair